
Raspberry Pi-based audio snippet recording and playback system
This solution is designed as a “phone booth” installation, where visitors can record a short story through a telephone handset, and also play back previous recordings left by earlier visitors.
The user flow is as follows:
- User is presented with two buttons: a red button for recording, and a green button for playback and a telephone handset
- User can press the green button and a random recording is selected from the moderated recordings and played through the USB telephone handset
- User can then press the red button and record a new story. A prompt will be played (see prompt.wav) providing basic instructions, then a beep signalling the start of recording, and finally when their time is complete, a different beep signifying the end of recording.
There is a moderation process, currently via USB stick:
New recordings will be saved to the recordings folder on the USB stick.
Existing recordings for playback will be stored in the moderated folder on the USB stick.
The moderation process involves removal of the USB stick and manual listening to the stories in recordings, and dragging any approved recordings to the moderated folder.
Starting from a fresh Raspbian Stretch installation:
# install required packages
sudo apt-get update
sudo apt-get install git python3-pip alsa-tools
Then clone this repo, then set up python dependencies:
cd your-call-python
# install python dependencies
pip3 install -r pip_versions.txt
Copy the 11-usb-drive-auto-mount.rules file into /etc/udev/rules.d/
Reload the udev rules:
sudo udevadm control --reload-rules
Then the USB drive should mount automatically at ‘/media/usb/’
[source: https://www.axllent.org/docs/view/auto-mounting-usb-storage/]
usage: main.py [-h] [-k] [-d D] [-f]

Record and play 1 minute audio

optional arguments:
  -h, --help  show this help message and exit
  -k          use keyboard instead of GPIO
  -d D        recording duration (seconds)
  -f          fake commands - print instead of running aplay/arecord
Copy/clone this whole your-call-python folder into /usr/local/bin/
Copy the your-call.sh file into /etc/init.d
Set up rc.d to run it at startup:
sudo update-rc.d your-call.sh defaults
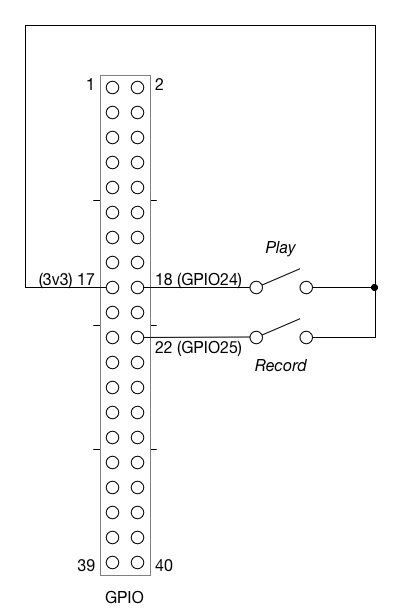
The project uses two external push buttons for the play and record functions. These are on GPIO channels 24 and 25 respectively, and are pulled down to ground with the Pi’s internal resistors, so no external resistor is required. The following circuit diagram shows the configuration:
 https://github.com/DrewMilloy/your-call-python
Leave a Reply