This project has reached the end of its development. Feel free to browse the code.
High-quality Web Components with a small footprint Thank you so much for showing interest in this project! If you want to help us feed our Octocat you should definitely become a stargazer. These web components are built to be used. They are lightweight, have a simple API and are easy to extend and compose. Go here to see a demo https://weightless.dev/elements.
High-quality: Centered around the best practices.
Testable: Hundreds of test-cases makes sure the library is stable.
Easy-to-use: But with a simple and understandable API.
Accessible: All components has been build with accessibility in mind.
Single-responsibility: Each component does one thing really well. This makes them really easy to extend and compose.
If you want to get started super quickly you can use the CLI.
$ npm init web-config new my-project --lit
If you prefer to use the umd bundle you can import https://unpkg.com/weightless/umd/weightless.min.js. Keep in mind that this imports all elements, so it is recommended that you only use it for test purposes.
There’s lots of exciting things on the roadmap. Until v1.0.0 you can expect the API to be fairly stable but refactoring might still happen and break the backwards compatibility. You are very welcome to use the library, create pull requests or add issues.
➤ Contributing guide
You are more than welcome to contribute to this repository! Below are some instructions on how to setup the project for development.
Clone this repository by running git clone https://github.com/andreasbm/weightless.git.
Run npm i to install all dependencies.
Spin up the development server with npm run s. The browser should automatically be opened at the correct url. If not, you can open your browser and go to http://localhost:1350.
Run tests with npm run test.
Lint the files with npm run lint.
Compile the documentation by running npm run docs.
The elements are written in Typescript and the stylesheets are written in SASS. All of the web components uses lit-element.
If you want to know more about how you can help you should definitely check out the CONTRIBUTING.md file. All contributors will be added to the contributors section below.
This project exists because a good Owlet camera doesn’t…
What we required
For a baby monitor, we required the following:
Local only network support, for security
Support for light and dark scenes (night and day naps)
Supports audio
HomeKit Secure video for historical videos when our baby does something funny.
An overlay for data from our Smart Sock 3
What we found
On the market, nothing… But a combo of available products let us do what we wanted with some work.
What you need
Owlet 3 Smart Sock (good luck buying it in the USA, thanks FDA)
A wyze 3 camera with starlight sensor
docker-wyze-bridge to get RTSP stream of the camera
OBS to rebroadcast the stream with an overlay
this tool to add the owlet overlay
Running this software
Grab OBS headless by using cieg/obs-docker:latest with docker
Install rtsp-simple-server – I recomend the docker container
Start running this docker container, which will publish owlet’s stats as HTML
Point OBS’s source to the RTSP stream of your camera (I use wyze, any rtsp works)
Add a browser source and point to this service’s HTML
Setup the stream in OBS to point to your rtsp-simple-server instance
Add to scrypted/blueiris/whatever you want by using the rtsp-simple-server proxy!
HomeKit Secure
You can add this to HKSV by using Scrypted – see that service for details. You will add this RTSP camera with the overlay as the source. A benefit of doing this is cloud recordings and AppleTV’s Picture-in-Picture mode for HK cameras meaning you can watch TV and have a small image of your baby on the screen to monitor!
AppCenterExtensions.AppInsights – This contains extension methods and ITelemetryInitializer implementations to be used in a ASP.NET Core web app for including AppCenter diagnostic information when logging to Application Insights
Getting Started
This library is configured almost the same way as the AppCenter SDK. You provide the AppCenter secrets, and specify whether to anonymize the user information. Both Crash Reporting and Analytics are always enabled when using AppCenterSetup.
The reason for the async API here is because anonymizeAppCenterUser internally relies on an async API. The synchronous API’s for starting AppCenter are non-blocking methods that do a fire-and-forget call to StartAsync(string,bool).
Anonymous User Information
The component AppCenterSetup exposes a method called UseAnonymousUserIdAsync() which sets the UserId in AppCenter to the first 8 characters a GUID that is unique per app installation. This can be used as a support key for uniquely identifying application users for instrumentation and troubleshooting. The support key can be attached to all HTTP calls by using the DiagnosticDelegatingHandler
Error Reporting
The library exposes extension methods to the Exception class for conveniently reporting Exceptions to AppCenter
Example:
try{// Something that blows upexplosives.Detonate();}catch(Exceptione){// Safely handle error then reporte.Report();}
ITrackingCommand
This library provides 3 convenience implementations of ICommand that will report the action to AppCenter Analytics after successfully invoking the execute callback method
TrackingCommand – This implementation accepts an Action as the Execute callback and a Func<bool> as the CanExecute callback
TrackingCommand – This implementation accepts an Action<T> as the Execute callback and a Func<T, bool> as the CanExecute callback
AsyncTrackingCommand – This implementation accepts a Func<Task> as the execute callback and a Func<bool> as the CanExecute callback. This also exposes a CompletionTask property that the consumer can await if desired. The Execute(object parameter) method here is a non-blocking call
Specifying the screenName argument in the constructor is optional and when this is not provided manually then it will use the declaring Type name from the method that instantiated the ITrackingCommand instance and convert it to a more analytics friendly event name using the ToTrackingEventName() extension method. In the example above, if the nameof(AboutViewModel).ToTrackingEventName() parameter is not provided then the owner declaring Type is AboutViewModel and the ScreenName will be set to "About"
Automatic Page Tracking
Automatic page tracking is enabled by replacing the base class of the ContentPage to classes to use TrackingContentPage class. By doing so the library will send page tracking information to AppCenter after leaving every page. Currently, the library will send the page Type, Title, and the duration spent on the screen. The library is rather opinionated on how to log information, and this will only change if I get a request to do so. Duration spent on screen is calculated using a Stopwatch that is started upon Page OnAppearing and is reported to Analytics upon OnDisappearing. The event name is based on the Type name of the Page and is split into multiple words based on pascal case rules and afterwards removes words like Page, View, Model, Async. For example: UserSettingsPage or UserSettingsView becomes User Settings
This library includes a trace listener implementation that reports to AppCenter. The reason for this is to cater to those who have implemented error handling or reporting using Trace Listeners, these types of users can just swap out (or add on) the AppCenterTraceListener
This implementation implements the following methods:
Write(object obj)
Write(object obj, string category)
WriteLine(object obj)
WriteLine(object obj, string category)
If the object provided is an Exception then this is reported to AppCenter Crash Reporting. If the object provided is an instance of AnalyticsEvent then this is sent to AppCenter Analytics
The AnalyticsEvent exposes 2 properties:
string EventName { get; } – self explanatory
IDictionary<string,string> Properties { get; } – Additional properties to attach to the Analytics event
To set it up you simply add an instance of AppCenterTraceListener to your existing Trace listeners:
Trace.Listeners.Add(newAppCenterTraceListener());
Here’s an example of how to use System.Diagnostics.Trace to report errors
try{// Something that blows upexplosives.Detonate();}catch(Exceptione){// Safely handle error then reportTrace.Write(e);// orTrace.Write(e,"Error");// orTrace.WriteLine(e);// orTrace.WriteLine(e,"Error");}
and here’s an example of to use System.Diagnostics.Trace to send analytics data
publicpartialclassApp:Application{privateconststringStateKey="State";publicApp(){// Some initialization code ...Trace.Listeners.Add(newAppCenterTraceListener());}protectedoverridevoidOnStart()=>Trace.Write(newAnalyticsEvent(nameof(Application),newDictionary<string,string>{{StateKey,nameof(OnStart)}}));protectedoverridevoidOnSleep()=>Trace.Write(newAnalyticsEvent(nameof(Application),newDictionary<string,string>{{StateKey,nameof(OnSleep)}}));protectedoverridevoidOnResume()=>Trace.Write(newAnalyticsEvent(nameof(Application),newDictionary<string,string>{{StateKey,nameof(OnResume)}}));}
Task Extensions
This library includes a few Task extension methods with AppCenter error reporting in mind. Possible exceptions that occur in the async operation are swallowed and reported to AppCenter. These extension methods will internally wrap the Task in a try/catch and await the Task using ConfigureAwait(false).
Here are usage some examples
Fire and Forget on a Task (Note: Forget() returns void)
The library provides a HttpMessageHandler implementation that logs non-successfuly HTTP results to AppCenter Analytics. This component will also attach HTTP headers describing the AppCenter SDK Version, Install ID, and a support key to all HTTP requests. The logged failed responses will contain the Endpoint URL (including the HTTP verb), Response status code, how the duration of the HTTP call. This will be logged under the event name HTTP Error
You will in most (if not all) cases would want to keep a singleton instance of the HttpClient. The DiagnosticDelegatingHandler is designed with unit testing in mind and accepts an IAnalytics and IAppCenterSetup interface, it also accepts an inner HttpMessageHandler if you wish to chain multiple delegating handlers.
The library provides an extension method to IServiceCollection called AddAppCenterTelemetry() that should be called from the ConfigureServices(IServiceCollection services) in your ASP.NET Core Startup class. This enables logging the AppCenter diagnostic information described in the previous section to Application Insights
Here’s an example taken from the Startup class in the sample web project
publicclassStartup{publicStartup(IConfigurationconfiguration){Configuration=configuration;}publicIConfigurationConfiguration{get;}publicvoidConfigureServices(IServiceCollectionservices){// Configure and register services to the IoCservices.AddApplicationInsightsTelemetry();services.AddAppCenterTelemetry();}publicvoidConfigure(IApplicationBuilderapp,IWebHostEnvironmentenv){// Configure app}}
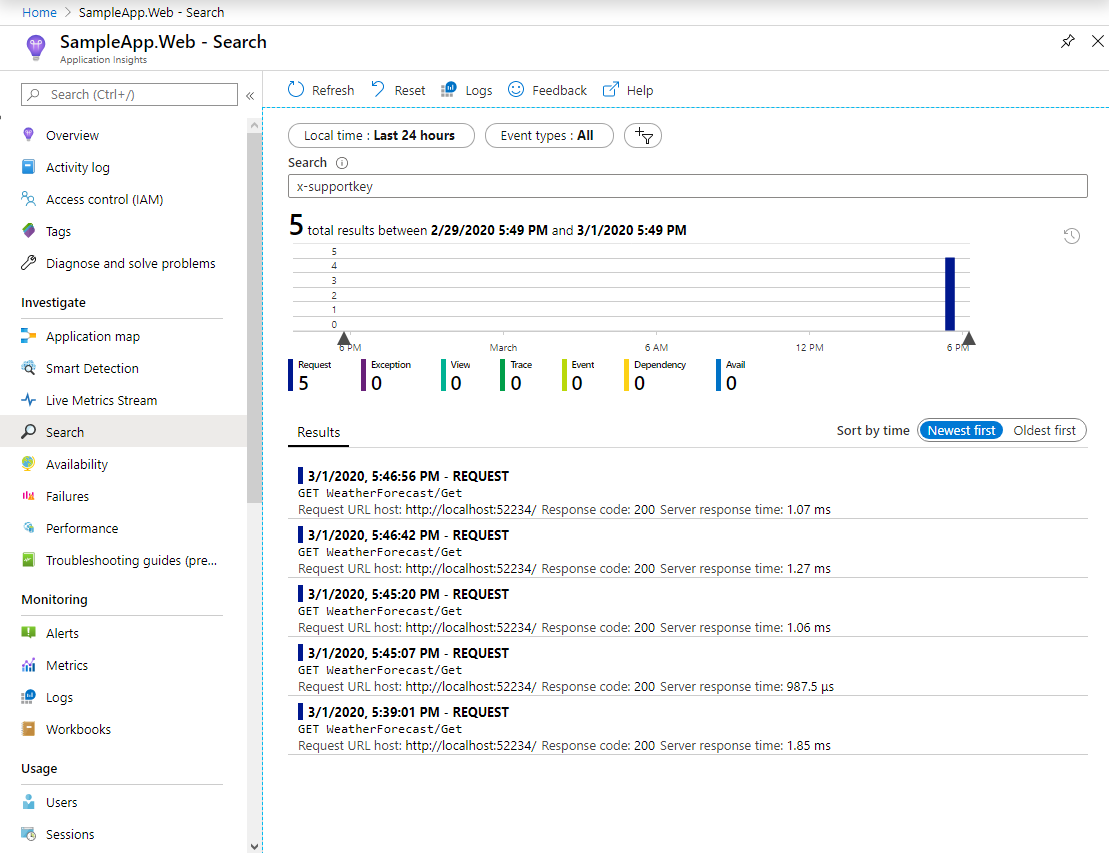
Once this is setup, AppCenter diagnostic information should now be searchable and visible in Application Insights. Here’s a screenshot of search results for the x-supportkey header
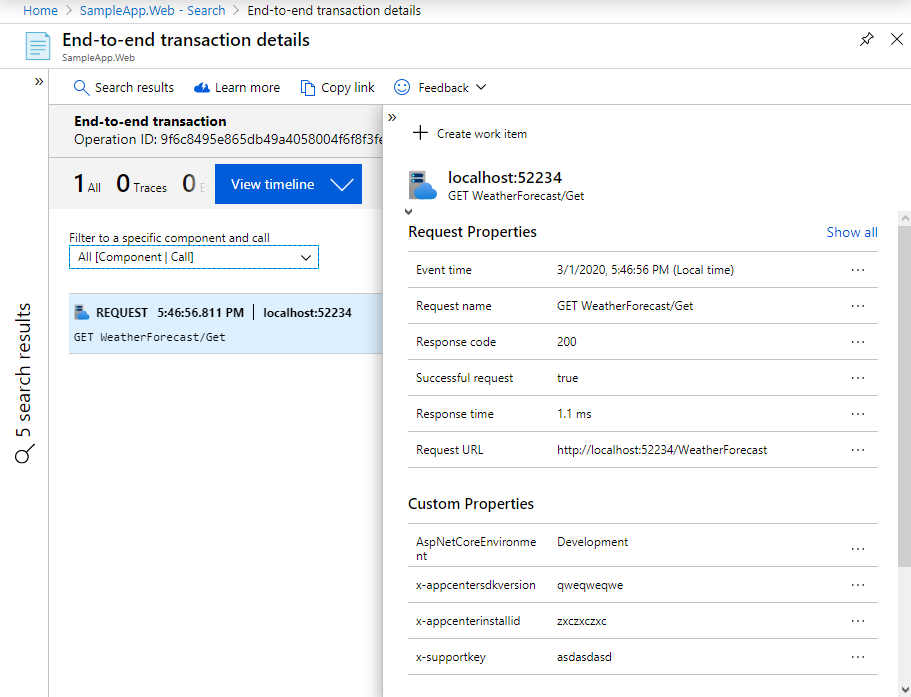
and here’s a screenshot of the details of a single request containing AppCenter diagnostic information logged in Application Insights
With this flow you can now correlate Crash Reports and Analytics data from AppCenter with the HTTP requests for your backend systems in Application Insights. In the systems that I have been involved with building we include the AppCenter diagnostic information from our API Gateway to all calls to our internal Microservices
For tips and tricks on software development, check out my blog
If you find this useful and feel a bit generous then feel free to buy me a coffee 🙂
Localhost in a different way for your development environment!
Developed entirely in Pure Javascript, the library was primarily created as a browser extension to customize the default “localhost” environment of Apache, Wamp and Xampp servers.
The extension would just change the default parsing of localhost, but as the process progressed I came up with new ideas that could be useful for application development, like having the project view in the same tab as localhost keeping the list of other projects while side, but of course not only with that, but with other tools.
Features
Project preview in Desktop and Mobile version.
Live Server, Real-time update of project changes.
Open project in Vscode directly from localhost, it is necessary to add the projects directory in settings.
Access database without leaving localhost, configuration is required to access phpmyadmin.
Useful Color Palettes.
Font Typography.
⚠ Warning: The extension is not yet available in browser stores, so the way
to use it at the moment is to download the .zip, extract and load the extension in developer mode.

✔ Browser -> Extension -> Enable Developer mode -> Load without compression and select Extension folder
Runs the app in the development mode.
Open http://localhost:3000 to view it in your browser.
The page will reload when you make changes.
You may also see any lint errors in the console.
npm test
Launches the test runner in the interactive watch mode.
See the section about running tests for more information.
npm run build
Builds the app for production to the build folder.
It correctly bundles React in production mode and optimizes the build for the best performance.
The build is minified and the filenames include the hashes.
Your app is ready to be deployed!
See the section about deployment for more information.
npm run eject
Note: this is a one-way operation. Once you eject, you can’t go back!
If you aren’t satisfied with the build tool and configuration choices, you can eject at any time. This command will remove the single build dependency from your project.
Instead, it will copy all the configuration files and the transitive dependencies (webpack, Babel, ESLint, etc) right into your project so you have full control over them. All of the commands except eject will still work, but they will point to the copied scripts so you can tweak them. At this point you’re on your own.
You don’t have to ever use eject. The curated feature set is suitable for small and middle deployments, and you shouldn’t feel obligated to use this feature. However we understand that this tool wouldn’t be useful if you couldn’t customize it when you are ready for it.
Neste site, você encontrará uma detalhada linha do tempo da carreira de Ayrton Senna, desde seus primeiros anos no kart até sua ascensão meteórica na Fórmula 1. Você poderá mergulhar em momentos icônicos, como suas vitórias em corridas lendárias, batalhas épicas com seus rivais e seus triunfos nos três campeonatos mundiais conquistados em 1988, 1990 e 1991.
⚠️ Atenção:
Este site é uma iniciativa independente criada por fãs de Ayrton Senna e não possui nenhuma afiliação oficial com a família de Senna ou com organizações relacionadas. Todo o conteúdo apresentado neste site é baseado em informações disponíveis publicamente.
Abaixo podemos ver o resultado final do projeto. Espero que gostem!
This is the reference codebase for measuring the performance of
Universal-ctags parsers.
How to run ctags for the code base
We assume you may have enough storage space on your PC.
Get the input code for a parser for the language you are
interested in with following command line:
$ ./codebase clone <LANGUAGE>
The following command lists available languages:
$ ./codebase list-languages
#           LANGUAGE    CODE
                   C    linux
                 C++    qtbase rocksdb
                  Go    buildah kubernetes
                HTML    cockpit
          JavaScript    cockpit
            LdScript    linux
          ObjectiveC    gnustep-libs-base
An example preparing C source code:
$ ./codebae clone C...
Run Universal-ctags for the cloned code with following command line:
$ [CTAGS_EXE=${where your ctags executable is}] ./codebase ctags <LANGUAGE> [<PROFILE>]
codebase refers CTAGS_EXE environment variable to run ctags.
–ctags ${where your ctags executable is} is an alternative way to
specify the ctags executable you want to test.
You can run ctags with different option combination.
We call such option combination PROFILE.
The following command is for listing predefined profiles:
$ ./codebase list-profiles

        PROFILE         DESCRIPTION
        maximum0        Enables all extras, fields, and kinds
        minimum0        Disables all fields and extras.
Results are displayed to your terminal. Tee’ed output goes
to a file under results/ directory.
An example command line for running C parser:
$ cd /home/yamato/hacking/ctags-github; ./autogen.sh; ./configure; make
$ cd /home/yamato/hacking/codebase
$ CTAGS_EXE=/home/yamato/hacking/ctags-github/ctags ./codebase ctags Cversion: 2c46f6d4features: +wildcards +regex +iconv +option-directory +xpath +json +interactive +sandbox +yaml +aspell +packcclog: results/2c46f6d4,C...................,..........,time......,default...,2019-03-18-12:47:20.logtagsoutput: /dev/nullcmdline: + /home/yamato/var/ctags-github/ctags --quiet --options=NONE --sort=no --options=profile.d/maps --totals=yes --languages=C -o - -R code/linux code/php-src code/ruby27886 files, 19784832 lines (555082 kB) scanned in 15.1 seconds (36686 kB/s)1158391 tags added to tag filereal 0m15.172suser 0m14.735ssys 0m0.399s+ set +x
In the above output, “36686 kB/s” represents the speed of parsing of C parser.
“1158391 tags” represents the number of tags captured by C parser.
codebase stores the cloned source code to code directory. The directory is
repository base. codebase makes another directory, lang, for your convince.
As the name shows, lang is language bases. You can run ctags directly on
a directory for the language you are interested in:
[codebase]$ cd lang[codebase/lang]$ lsAsm C++ GDScript Java Kconfg Lua Markdown Perl R SQL VHDLBasic CMake Go JavaScript Kotlin Make Meson PHP RSpec SystemTap XSLTC Fortran HTML Julia LdScript Man OpenAPI PuppetManifest Ruby Vala YACC[codebase/lang]$ ~/var/ctags-developing/ctags -R JavaScriptctags: Warning: ignoring null tag in JavaScript/mediawiki/.svgo.config.js(line: 6)ctags: main/entry.c:1454: registerEntry: Assertion `corkIndex != CORK_NIL' failed.ctags: main/entry.c:1454: parsing JavaScript/mediawiki/.svgo.config.js:6 as JavaScriptAborted (core dumped)
How to add your code to code base
You have to write a .lcopy file and put it to lcopy.d directory.
See lcopy.d/linux.lcopy as an example:
REPO specifies a git repository. ALIGNMENT is a tag put on the
git repository. ALIGNMENT allows users of codebase to get the same
source tree. LANGUAGES is a comma separated language list.
How to add your profile to preset list
You have to write a .ctags file and put it to profile.d directory.
A line started from “# @” is used as a description for the profile.
You may wan to use –options-maybe to extend profile without
modifying existing .ctags files.
Raspberry Pi-based audio snippet recording and playback system
Solution Overview
This solution is designed as a “phone booth” installation, where visitors can record a short story through a telephone handset, and also play back previous recordings left by earlier visitors.
The user flow is as follows:
User is presented with two buttons: a red button for recording, and a green button for playback and a telephone handset
User can press the green button and a random recording is selected from the moderated recordings and played through the USB telephone handset
User can then press the red button and record a new story. A prompt will be played (see prompt.wav) providing basic instructions, then a beep signalling the start of recording, and finally when their time is complete, a different beep signifying the end of recording.
Moderation of Recordings
There is a moderation process, currently via USB stick:
New recordings will be saved to the recordings folder on the USB stick.
Existing recordings for playback will be stored in the moderated folder on the USB stick.
The moderation process involves removal of the USB stick and manual listening to the stories in recordings, and dragging any approved recordings to the moderated folder.
Software Setup
Setting up the platform
Starting from a fresh Raspbian Stretch installation:
usage: main.py [-h] [-k] [-d D] [-f]

Record and play 1 minute audio

optional arguments:
  -h, --help  show this help message and exit
  -k          use keyboard instead of GPIO
  -d D        recording duration (seconds)
  -f          fake commands - print instead of running aplay/arecord
Setting up this program to run as a service on startup
Copy/clone this whole your-call-python folder into /usr/local/bin/
The project uses two external push buttons for the play and record functions. These are on GPIO channels 24 and 25 respectively, and are pulled down to ground with the Pi’s internal resistors, so no external resistor is required. The following circuit diagram shows the configuration:
Teodle is a Python-powered website for Twitch streamer Teo, to watch game clips submitted by his community and guess the ranks.
The livestream viewers can also participate in the game by casting their votes in the Twitch chat.
The most accurate viewers are displayed on the leaderboard.
Ranking System
The ranking system in Teodle is primarily based on stars, the more stars, the higher the score.
The rules are simple:
If you guess the exact rank of a game clip, you get 2 stars.
If you are 1 rank off, you get 1 star.
Otherwise, you get no stars.
Live Participation
Viewers can play along during livestreams by voting in the chat and competing for both accuracy and speed. The leaderboard showcases the top performing viewers.


 https://github.com/andreasbm/weightless